Thursday, 26 June 2008

NAudio 1.2 Release Notes

I have released a new version of NAudio today on CodePlex. NAudio is an open source audio toolkit for .NET. It has been over a year since our last release, so let me run through a few of the highlights for this release.

WASAPI Output Model. We are now able to play audio using the new WASAPI output APIs in Windows Vista. We support shared mode and exclusive mode, and you can optionally use event callbacks for the buffer population. You may need to experiment to see what settings work best with your soundcard.

ASIO Output Model. We can also play back audio using any ASIO output drivers on your system. It is not working yet with all soundcards, but its working great with the ever-popular ASIO4All.

New DirectSound Output Model We have moved away from using the old managed DirectX code for DirectSound output, and done the interop ourselves. This gives us a much more reliable way to use DirectSound.

IWavePlayer simplifications. As part of our ongoing plans to improve the NAudio architecture, the IWavePlayer interface has gone on a diet and lost some unnecessary methods.

ResamplerDMO stream. Some Windows Vista systems have a Resampler DirectX Media Object that can be used to convert PCM and IEEE audio samples between different sample rates and bit depths. We have provided a managed wrapper around this, and it is used internally by the WASAPI output stream to do sample rate conversion if required.

ACM Enhancements - There have been a number of bugfixes and enhancements to the support for using the ACM codecs in your system.

BlockAlignmentReductionStream - This WaveStream helps to alleviate the problem of dealing with compressed audio streams whose block alignment means that you can't position exactly where you want or read the amount you want. BlockAlignmentReductionStream uses buffering and read-ahead to allow readers full flexibility over positioning and read size.

MP3 Playback - The MP3 File Reader Stream is now able to work with any wave output thanks to the BlockAlignmentReductionStream and playback MP3 files without stuttering. It uses any MP3 ACM decoder it can find on your system.

Custom WaveFormat Marshaler - The WaveFormat structure presents an awkward problem for interop with unmanaged code. A custom marshaler has been created which will be extended in future versions to allow WaveFormat structures to present their extra data.

NAudioDemo - One of the problems with NAudio has been that there are very few examples of how to use it. NAudioDemo has four mini-examples of using NAudio:

  • receiving MIDI input
  • playing WAV or MP3 files through any output
  • examining ACM codecs and converting files using them
  • recording audio using WaveIn

In addition the AudioFileInspector, MixDiff, MIDI File Splitter and MIDI File Mapper projects demonstrate other aspects of the NAudio framework.

Unit Tests - NAudio now has a small collection of unit tests, which we intend to grow in future versions. This will help us to ensure that as the feature set grows, we don't inadvertently break old code.

IWaveProvider Tech Preview - As discussed recently on my blog, we will be using a new interface called IWaveProvider in future versions of NAudio, which uses the WaveBuffer class. This code is available in the version 1.2 release, but you are not currently required to use it.

Alexandre Mutel - Finally, this version welcomes a new contributor to the team. In fact, Alexandre is the first contributor I have added to this project. He has provided the new implementations of ASIO and DirectSoundOut, as well as helping out with WASAPI and the new IWaveProvider interface design. His enthusiasm for the project has also meant that I have been working on it a little more than I might have otherwise!

It's A Beta - I do need to remind you that all these features should be thought of as being in "beta" state. We do not have the resources to exhaustively test with all the different soundcards that are available. Please report any bugs you encounter via the issue tracker on CodePlex.

What's Coming Up - NAudio tends to progress by adding features on an as-needed basis. The good news is that we have lots of ideas for NAudio's future, and we are hoping that version 1.3 will offer several features from the list below:

  • More extensive use of the new IWaveProvider interface
  • Audio Capture for WASAPI
  • Audio Capture for ASIO
  • NAudioDemo to be updated to demonstrate more features
  • Improving error handling and robustness of WASAPI, ASIO and DirectSound outputs
  • ... plus lots more goodies that we will announce later!

Anyway, just in case you haven't already worked out where to download it, here's the link: NAudio 1.2
Sunday, 22 June 2008

WaveBuffer - Casting Byte Arrays to Float Arrays

A while ago on my blog I wrote about a C# language feature that I wanted - reinterpret casts between arrays of structs. One reason this would be so useful to me is that I want to improve the design of my open source audio library NAudio, and create an IWaveProvider interface that allows people to output their audio data in whatever format is most convenient for them. Audio is sometimes in 16 bit integer format, sometimes in 32 bit floating point format, and sometimes in compressed blocks of bytes (other common scenarios include 24 bit integers and 64 bit double precision floating point audio).

In the world of C/C++, this isn't a problem. The Read method of IWaveProvider simply needs to take a void pointer that can be cast to a byte, short or float pointer as appropriate. In .NET things are not nearly so simple. True, there are 'unsafe' pointers in C#, but using them immediately excludes developers from other .NET languages such as VB.NET from using the framework. Also, when reading or writing data from files in .NET, you must work with the System.IO.Stream class that expects reads and writes to provide byte arrays, requiring a manual copy from the pointer to an array.

My initial idea was to simply provide a variety of Read functions for IWaveProvider, and provide helper functions in an abstract base class that would allow users just to implement the one Read method whose signature best fitted their needs:

interface IWaveProvider 
{
   int Read(byte[] buffer, int byteCount);
   int Read(short[] buffer, int sampleCount);
   int Read(float[] buffer, int sampleCount);
   ...

However, a new contributor to the NAudio project, Alexandre Mutel, has come up with an ingenious solution thanks to a brilliant piece of lateral thinking. Suppose we define a WaveBuffer class that uses an explicit structure layout:

[StructLayout(LayoutKind.Explicit, Pack=2)]
public class WaveBuffer : IWaveBuffer
{
   [FieldOffset(0)]
   public int numberOfBytes;
   [FieldOffset(4)]
   private byte[] byteBuffer;
   [FieldOffset(4)]
   private float[] floatBuffer;
   [FieldOffset(4)]
   private short[] shortBuffer;
   ...

This class has some interesting capabilities. You can set byteBuffer to point to a new byte array, but then access it using floatBuffer. Sounds dangerous? Well it compiles, and initial tests show that it works just fine. It is true that using the floatBuffer accessor will let you write beyond the end of available space, but so long as you never write more than the requested number of samples to the buffer, you are safe. This structure even survives garbage collections without any issues.

This allows us to simplify our IWaveProvider interface dramatically:

interface IWaveProvider
{
   int Read(IWaveBuffer buffer);
   ...

Implementers of the Read method then have a choice of which buffer they write into. If they simply want to write samples (whether 16 bit integers or 32 bit floats) that is fine, but equally if it is easier to provide their data as a byte array (for example when reading from a WAV file), then that can be done. The WaveBuffer trick effectively gives us the casting feature we need.

Sounds too good to be true? Well there are some potential concerns. This approach could be described as a bit of a "hack". Do we know for sure that in a future version of the .NET framework it will still work (or even compile)? Does it work with 64 bit Windows? Could there be a garbage collection scenario we have not yet encountered that would cause us pr oblems? Would people object to using a hack like this right at the core of the NAudio framework?

The solution to these concerns is fairly simple. We will use an interface, IWaveBuffer instead of using WaveBuffer itself. This allows us to create an alternative implementation if ever we find that WaveBuffer has any issues.

So the plan is that NAudio will be migrating to use IWaveProvider and IWaveBuffer in the future (not for version 1.2, but probably appearing in the following version), but if anyone can think of any problems with using the proposed WaveBuffer class, I would be interested to hear them.

Saturday, 21 June 2008

Styling a ListBox With Silverlight 2 Beta 2 (Part 2) - Scrollbars

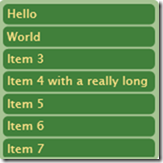
In my first post, I explained how to create a very basic ListBox and ListBoxItem style that governed the appearance of a ListBox. It is still very rudimentary though, and doesn't give any visual feedback of selected items or mouse over. It also doesn't have any scrollbars. Here's what we have so far (with a few changes to the colours - although I'm not sure it's an improvement!):

image2

Adding scrollbars is actually quite simple. All we need to do is add a ScrollViewer to our ListBox style.

<Border Padding="3" Background="#E6BB8A" CornerRadius="5">
   <ScrollViewer x:Name="ScrollViewer"
       Padding="{TemplateBinding Padding}">
       <ItemsPresenter />
   </ScrollViewer>
</Border>

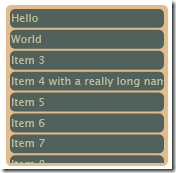
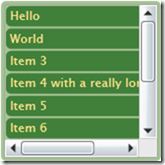
Which gives us scrollbars:

image3

Unfortunately, as nice as the default scrollbars look, they do not fit at all with the visual theme of our ListBox. We need another style which we will base on the default ScrollViewer style.

Here's the ScrollViewer template, slightly customised to remove the border and the square in the bottom right-hand corner. It looks a little intimidating because I left in most of the stuff from the default ScrollViewer style. We could have got rid of a lot of it, but as we are not planning to customise this part very much, we will leave it in there.

<Style TargetType="ScrollViewer" x:Key="ScrollViewerStyle1">
   <Setter Property="IsEnabled" Value="true" />
   <Setter Property="Foreground" Value="#FF000000" />
   <Setter Property="BorderBrush" Value="#FFA4A4A4" />
   <Setter Property="BorderThickness" Value="1" />
   <Setter Property="HorizontalContentAlignment" Value="Left" />
   <Setter Property="VerticalContentAlignment" Value="Top" />
   <Setter Property="Cursor" Value="Arrow" />
   <Setter Property="TextAlignment" Value="Left" />
   <Setter Property="TextWrapping" Value="NoWrap" />
   <!-- Cannot currently parse FontFamily type in XAML so it's being set in code -->
   <!-- <Setter Property="FontFamily" Value="Trebuchet MS" /> -->
   <Setter Property="FontSize" Value="11" />
   <Setter Property="VerticalScrollBarVisibility" Value="Visible" />
   <Setter Property="Template">
       <Setter.Value>
           <ControlTemplate TargetType="ScrollViewer">
               <Grid Background="{TemplateBinding Background}">
                   <Grid.ColumnDefinitions>
                       <ColumnDefinition Width="*"/>
                       <ColumnDefinition Width="Auto"/>
                   </Grid.ColumnDefinitions>
                   <Grid.RowDefinitions>
                       <RowDefinition Height="*"/>
                       <RowDefinition Height="Auto"/>
                   </Grid.RowDefinitions>
                   <!-- Fill="{DynamicResource {x:Static SystemColors.ControlBrushKey}}" -->
                   <ScrollContentPresenter
                     x:Name="ScrollContentPresenter"
                     Grid.Column="0"
                     Grid.Row="0"
                     Content="{TemplateBinding Content}"
                     ContentTemplate="{TemplateBinding ContentTemplate}"
                     Cursor="{TemplateBinding Cursor}"
                     Background="{TemplateBinding Background}"
                     HorizontalContentAlignment="{TemplateBinding HorizontalContentAlignment}"
                     TextAlignment="{TemplateBinding TextAlignment}"
                     TextDecorations="{TemplateBinding TextDecorations}"
                     TextWrapping="{TemplateBinding TextWrapping}"
                     VerticalContentAlignment="{TemplateBinding VerticalContentAlignment}"
                     Margin="{TemplateBinding Padding}" />
                   <ScrollBar
                     x:Name="VerticalScrollBar"
                     Grid.Column="1"
                     Grid.Row="0"
                     Orientation="Vertical"
                     Cursor="Arrow"
                     Visibility="{TemplateBinding ComputedVerticalScrollBarVisibility}"
                     ViewportSize="{TemplateBinding ViewportHeight}"
                     Minimum="0"
                     Maximum="{TemplateBinding ScrollableHeight}"
                     Value="{TemplateBinding VerticalOffset}"
                     Width="18"/>
                   <ScrollBar
                     x:Name="HorizontalScrollBar"
                     Grid.Column="0"
                     Grid.Row="1"
                     Orientation="Horizontal"
                     Cursor="Arrow"
                     Visibility="{TemplateBinding ComputedHorizontalScrollBarVisibility}"
                     ViewportSize="{TemplateBinding ViewportWidth}"
                     Minimum="0"
                     Maximum="{TemplateBinding ScrollableWidth}"
                     Value="{TemplateBinding HorizontalOffset}"
                     Height="18"/>
               </Grid>
           </ControlTemplate>
       </Setter.Value>
   </Setter>
</Style>

So now we need to tell our ScrollViewer to use this style.

<ScrollViewer x:Name="ScrollViewerElement"
   Style="{StaticResource ScrollViewerStyle1}"
   Padding="{TemplateBinding Padding}">
   <ItemsPresenter />
</ScrollViewer>

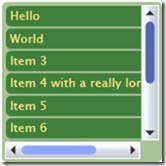
And this is what it looks like:

image8

Kind of disappointing, huh? That's because we haven't styled the scrollbars themselves yet. Now we need to take a look at the default scrollbar style. Now these really are intimidating. They contain hundreds of lines of XAML with plenty of VisualStates, Storyboards and gradients. Even more confusingly they contain templates within templates.

We will progress by looking at each of these sub-templates one by one. First up is HorizontalIncrementTemplate, which is the right-arrow at the end of the horizontal scrollbar. Here's a simplified version of the default implementation:

<ControlTemplate x:Key="HorizontalIncrementTemplate" TargetType="RepeatButton">
   <Grid x:Name="Root" Background="#00000000">
       <vsm:VisualStateManager.VisualStateGroups>
           <vsm:VisualStateGroup x:Name="CommonStates">
               <vsm:VisualStateGroup.Transitions>
                   <vsm:VisualTransition To="MouseOver" Duration="0:0:0.2" />
               </vsm:VisualStateGroup.Transitions>
               <vsm:VisualState x:Name="Normal" />
               <vsm:VisualState x:Name="MouseOver">
                   <Storyboard>
                       <ColorAnimation Storyboard.TargetName="ButtonColor" Storyboard.TargetProperty="Color" To="#FF557E9A" Duration="0" />
                   </Storyboard>
               </vsm:VisualState>
               <vsm:VisualState x:Name="Disabled">
                   <Storyboard>
                       <DoubleAnimation Storyboard.TargetName="ButtonVisual" Storyboard.TargetProperty="Opacity" To=".6" Duration="0" />
                   </Storyboard>
               </vsm:VisualState>
           </vsm:VisualStateGroup>                                           
       </vsm:VisualStateManager.VisualStateGroups>
       <Grid.ColumnDefinitions>
           <ColumnDefinition Width="35*"/>
           <ColumnDefinition Width="30*"/>
           <ColumnDefinition Width="35*"/>
       </Grid.ColumnDefinitions>
       <Grid.RowDefinitions>
           <RowDefinition Height="25*"/>
           <RowDefinition Height="50*"/>
           <RowDefinition Height="25*"/>
       </Grid.RowDefinitions>
       <Path x:Name="ButtonVisual" Grid.Column="1" Grid.Row="1" Stretch="Fill" Data="F1 M 511.047,352.682L 511.047,342.252L 517.145,347.467L 511.047,352.682 Z ">
           <Path.Fill>
               <SolidColorBrush x:Name="ButtonColor" Color="#FF313131" />
           </Path.Fill>
       </Path>
   </Grid>
</ControlTemplate>

Although this looks like a lot of code, all that is happening is simply a triangle is being drawn. The grid simply serves to give an appropriate margin around the triangle. The animations change the colour for mouse-over. I have removed the focus rectangle as I don't need it for my purposes. The actual background to the arrow is drawn by another part of the template. So for now I will leave these as they are and to move onto the "Thumb" components.

I have simplified the thumb component to be a rounded rectangle that changes colour as you hover over it. I also played with the margins to make it a little thinner. Here is my modified VerticalThumbTemplate:

<ControlTemplate x:Key="VerticalThumbTemplate" TargetType="Thumb">
   <Grid>
       <vsm:VisualStateManager.VisualStateGroups>
           <vsm:VisualStateGroup x:Name="CommonStates">
               <vsm:VisualStateGroup.Transitions>
                   <vsm:VisualTransition To="MouseOver" Duration="0:0:0.1" />
               </vsm:VisualStateGroup.Transitions>
               <vsm:VisualState x:Name="Normal" />
               <vsm:VisualState x:Name="MouseOver">
                   <Storyboard>
                       <ColorAnimation Storyboard.TargetName="ThumbForeground"
                                       Storyboard.TargetProperty="Color"
                                       To="{StaticResource ThumbHoverColor}" Duration="0" />
                   </Storyboard>
               </vsm:VisualState>
               <vsm:VisualState x:Name="Disabled">
                   <Storyboard>
                       <DoubleAnimation Storyboard.TargetName="ThumbVisual"
                                        Storyboard.TargetProperty="Opacity"
                                        To=".6" Duration="0" />
                   </Storyboard>
               </vsm:VisualState>
           </vsm:VisualStateGroup>
       </vsm:VisualStateManager.VisualStateGroups>

       <Grid x:Name="ThumbVisual">
           <Rectangle x:Name="Background"
               Margin="4.5,.5,4.5,.5"
               RadiusX="5" RadiusY="5" >
               <Rectangle.Fill>
                   <SolidColorBrush x:Name="ThumbForeground"
                   Color="{StaticResource ThumbForegroundColor}" />
                </Rectangle.Fill>
           </Rectangle>
       </Grid>
   </Grid>
</ControlTemplate>

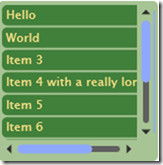
With a similar change to the HorizontalThumbTemplate, our scrollbars are now finally beginning to change in appearance (n.b. To see the changes we have also had to modify our ScrollViewer style so that the two scrollbars it creates use the new ScrollBar style). Here's a screenshot showing the mouse hovering over the vertical thumb:

image31

Finally we are ready to update the remaining parts of the ScrollBar template - HorizontalRoot and VerticalRoot. Both are made up of a grid containing four repeat buttons and a thumb. Two of the repeat buttons are for the increment icons, while the other two are the invisible parts either side of the thumb that you can click for a large change.

Again, the change is simply to get rid of a load of unnecessary stuff. In our case we are simply putting a thin rounded rectangle behind the thumb and invisible repeat buttons, with no background behind the small increment buttons. Here's the new HorizontalRoot template:

<!-- Horizontal Template -->
<Grid x:Name="HorizontalRoot">
   <Grid.ColumnDefinitions>
       <ColumnDefinition Width="Auto" />
       <ColumnDefinition Width="Auto" />
       <ColumnDefinition Width="Auto" />
       <ColumnDefinition Width="*" />
       <ColumnDefinition Width="Auto" />
   </Grid.ColumnDefinitions>

   <Grid.RowDefinitions>
       <RowDefinition />
       <RowDefinition />
   </Grid.RowDefinitions>

   <!-- Track Layer -->
   <Rectangle Margin="1,6,1,6"
     Grid.RowSpan="2" Grid.Column="1"        
     Grid.ColumnSpan="3" Fill="#FF606060"
     RadiusX="3" RadiusY="3" />

   <!-- Repeat Buttons + Thumb -->
   <RepeatButton x:Name="HorizontalSmallDecrease" Grid.Column="0" Grid.RowSpan="2" Width="16" IsTabStop="False" Interval="50" Template="{StaticResource HorizontalDecrementTemplate}" />
   <RepeatButton x:Name="HorizontalLargeDecrease" Grid.Column="1" Grid.RowSpan="2" Width="0" Template="{StaticResource RepeatButtonTemplate}" Interval="50" IsTabStop="False" />
   <Thumb x:Name="HorizontalThumb" MinWidth="10" Width="20" Grid.Column="2" Grid.RowSpan="2" Template="{StaticResource HorizontalThumbTemplate}" />
   <RepeatButton x:Name="HorizontalLargeIncrease" Grid.Column="3" Grid.RowSpan="2" Template="{StaticResource RepeatButtonTemplate}" Interval="50" IsTabStop="False" />
   <RepeatButton x:Name="HorizontalSmallIncrease" Grid.Column="4" Grid.RowSpan="2" Width="16" IsTabStop="False" Interval="50" Template="{StaticResource HorizontalIncrementTemplate}" />
</Grid>

We make a similar change for the VerticalRoot and here's what it looks like:

image6

The bar alongside the vertical scrollbar is actually a very stretched horizontal scrollbar. For some reason, while it successfully uncollapses the VerticalRoot, it does not collapse the HorizontalRoot when you create a vertical scrollbar. After much frustration I discovered that this is a known bug in the current Silverlight beta and sadly it has not been fixed in Beta 2.

So finally we have completely customised scrollbars for our ListBox. Please excuse my hideous choice of colours. I am not a designer! I hope to add one further post to add the remaining two features to make our ListBox complete:

  • Selected Item Rendering
  • Mouse Over Rendering

Continue to Part 3...

Thursday, 19 June 2008

Styling a ListBox With Silverlight 2 Beta 2 (Part 1)

This post is an updated version of an earlier series I wrote on how to style a ListBox with Silverlight. I hope to update all three parts over the coming days. This tutorial is not about how to use Expression Blend, as there are plenty of other blogs that will explain that. This is for those who like to go right to the XAML.

One of the challenges of styling a control like the ListBox in Silverlight is the sheer number of subcomponents it uses. A ListBox has its own template which includes a ScrollViewer and an ItemPresenter. The ScrollViewer contains Scrollbars which contain RepeatButtons, Thumbs etc.

My original idea was to make copies of the default styles and slowly change them to look how I wanted, but I soon realised that the sheer quantity of XAML would get very confusing. So I decided to take the opposite approach. Start with a very basic template and slowly add features until it looks right. So here is the most basic of all ListBox styles which contains just a simple template:

<Style x:Key="ListBoxStyle1" TargetType="ListBox">
    <Setter Property="Template">
        <Setter.Value>
            <ControlTemplate TargetType="ListBox">
                <Grid x:Name="Root">
                    <ItemsPresenter />
                </Grid>
            </ControlTemplate>
        </Setter.Value>
    </Setter>
</Style>

This simply presents the items, with no outline of any sort displayed. To test our style, let's add some items to a ListBox (notice that with Silverlight 2 Beta 2 I need to put TextBlocks inside my ListBoxItem instead of just text that worked fine in Beta 1)

<ListBox Margin="5" Width="160" Height="160"
 Style="{StaticResource ListBoxStyle1}">
    <ListBoxItem><TextBlock Text="Hello"/></ListBoxItem>
    <ListBoxItem><TextBlock Text="World"/></ListBoxItem>
    <ListBoxItem><TextBlock Text="Item 3"/></ListBoxItem>
    <ListBoxItem><TextBlock Text="Item 4 with a really long name"/></ListBoxItem>
    <ListBoxItem><TextBlock Text="Item 5"/></ListBoxItem>
    <ListBoxItem><TextBlock Text="Item 6"/></ListBoxItem>
    <ListBoxItem><TextBlock Text="Item 7"/></ListBoxItem>
    <ListBoxItem><TextBlock Text="Item 8"/></ListBoxItem>
    <ListBoxItem><TextBlock Text="Item 9 out of bounds"/></ListBoxItem>
    <ListBoxItem><TextBlock Text="Item 10 out of bounds"/></ListBoxItem>
</ListBox>

This is what it looks like so far:

ListBox Style Step 1

Next step is the border for our ListBox. I want all the ListBox items to be drawn on top of a filled rounded rectangle. To do this, I have added a Border control. I have given it some padding so we can actually see it, because the ListBoxItem template is currently drawing white rectangles over the top of it.

<Grid x:Name="Root">
  <Border Padding="5" Background="#E6BB8A" CornerRadius="5">
    <ItemsPresenter />
  </Border>
</Grid>

This is what it looks like now:

Listbox Style Step 2

So before we go doing anything further to the ListBox template itself (like adding scrollbars), let's sort out the item templates.

For this we need to create a new style - ListBoxItemStyle1. Here is a minimal ListBoxItem style:

<Style x:Key="ListBoxItemStyle1" TargetType="ListBoxItem">
    <Setter Property="Foreground" Value="#FF000000" />    
    <Setter Property="Template">
        <Setter.Value>
            <ControlTemplate TargetType="ListBoxItem">
                <Grid x:Name="Root">
                    <ContentPresenter
                        Content="{TemplateBinding Content}"
                        Foreground="{TemplateBinding Foreground}"
                     />                    
                </Grid>
            </ControlTemplate>
        </Setter.Value>
    </Setter>
</Style>

As you can see, it is a little more involved than the basic ListBox template. We needed to have the Foreground property set to a sensible default value (Black) for anything to appear. And we have simply used one ContentPresenter control to show the contents of each ListBox item.

(n.b. Remember to define the ListBoxItemStyle before your ListBox style. Expression Blend will be OK with this, but when you come to run it, Silverlight will fail with one of its characteristically unhelpful errors.)

We can tell our ListBox to use it by modifying our ListBox Style as follows:

<Style x:Key="ListBoxStyle1" TargetType="ListBox">
    <Setter Property="ItemContainerStyle" Value="{StaticResource ListBoxItemStyle1}" />
    <Setter Property="Template">
        ...

Now we have got rid of those white backgrounds:

ListBox Style Step 3

Finally we will make the item template just a little more interesting. I've added a border to the item presenter, and modified some margins and colours:

<Border CornerRadius="5" Background="#51615B" Margin="1">
<ContentPresenter
    Margin="1"
    Content="{TemplateBinding Content}"
    Foreground="{TemplateBinding Foreground}"
 />                    
 </Border>

This leaves us with something looking like this:

ListBox Style Step 4

So that is at least a reasonable start. Our ListBox is missing at least three crucial features though, which I will tackle in a future blog-post:

  • Scrollbars
  • Selected Item Rendering
  • Mouse Over Rendering

Continue to Part 2...

Friday, 13 June 2008

Creating a Piano Roll in WPF Part 3 - Data Binding

I have posted a couple of times on creating a Piano Roll control in WPF. (Part 1 and Part 2). Today I want to take a slight digression and ask whether this could be accomplished more elegantly using a data binding approach. I went to an excellent presentation by Josh Twist on WPF and data binding yesterday in which he claimed that if you are not using data binding in WPF, you a probably missing something.

So I decided to experiment. First, rather than setting a property on our PianoRoll control, we simply set the DataContext of our Window and let it propagate down:

MidiFile midiFile = new MidiFile(openFileDialog.FileName);
this.DataContext = midiFile.Events;

Now we can bind a plain old ListBox to that property. Unfortunately because the MidiEventCollection is not simply a list of events but a list of lists (one per track), I need to use the slightly odd .[2] path binding syntax to get at the events for the third track (which is typically the first one with any notes on for multi-timbral MIDI files).

<ListBox Grid.Row ="1" x:Name="PianoRollListBox" ItemsSource="{Binding Path=.[2]}" />

Here's what it looks like:

Binding a listbox to MIDI

Now it is very cool that we can get a textual representation so easily, but of course this is not the look we are after. We need to change the ItemsPanel which by default is a StackPanel and make it a Canvas instead:

<ListBox Grid.Row ="1" x:Name="PianoRollListBox" 
         ItemsSource="{Binding Path=.[2]}">
    <ListBox.ItemsPanel>
        <ItemsPanelTemplate>
            <Canvas />
        </ItemsPanelTemplate>
    </ListBox.ItemsPanel>
</ListBox>

Visually, things get worse...

Binding to a Canvas

So now we want to get back to having rectangles representing MIDI events. First we need to do some sizing and scaling on our ItemsPanel Canvas to get things roughly the right size. Then we will create a DataTemplate for the rectangle itself. The only property we bind to is the NoteLength, which is used to set the rectangle's Width.

<ListBox Grid.Row ="1" x:Name="PianoRollListBox" 
         ItemsSource="{Binding Path=.}" 
         ItemContainerStyle="{StaticResource PianoRollItemContainerStyle}">
    <ListBox.ItemsPanel>
        <ItemsPanelTemplate>
            <Canvas Height="1280" Width="4000">
                <Canvas.RenderTransform>
                    <ScaleTransform ScaleX="0.2" ScaleY="10" />
                </Canvas.RenderTransform>
            </Canvas>
        </ItemsPanelTemplate>
    </ListBox.ItemsPanel>
    <ListBox.ItemTemplate>
        <DataTemplate>
            <Rectangle 
                Fill="Red"
                Height="1"
                Width="{Binding NoteLength}" />
        </DataTemplate>
    </ListBox.ItemTemplate>
</ListBox>

The X and Y coordinates of each Rectangle are set by our ItemContainerStyle. We can't do this in the DataTemplate because each Rectangle will not be a direct child element of the ItemsPanel Canvas. Our ItemContainerStyle is very basic, simply holding a ContentPresenter. But it is in here that we can position our rectangles by binding to AbsoluteTime and NoteNumber of the NoteOn event and using them to set the Canvas.Left and Canvas.Top values. Here's the style:

<Style x:Key="PianoRollItemContainerStyle" TargetType="{x:Type ListBoxItem}">
    <Setter Property="Canvas.Left" Value="{Binding AbsoluteTime}" />
    <Setter Property="Canvas.Top" Value="{Binding NoteNumber}" />
    <Setter Property="Template">
        <Setter.Value>
            <ControlTemplate TargetType="{x:Type ListBoxItem}">
                <ContentPresenter x:Name="ContentHost" 
                                  Margin="{TemplateBinding Padding}" 
                    HorizontalAlignment="{TemplateBinding HorizontalContentAlignment}" 
                    VerticalAlignment="{TemplateBinding VerticalContentAlignment}" />
            </ControlTemplate>
        </Setter.Value>
    </Setter>
</Style>

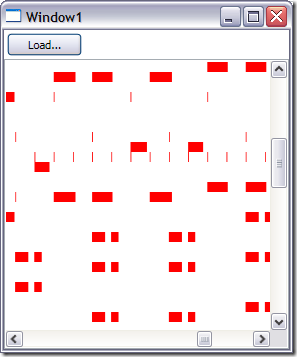
So now we have a functional (albeit still very basic) Piano Roll view with only one line of code behind.

WPF Binding to Canvas

As cool as this is, there are a number of issues with the data binding approach.

1. Speed - it is not nearly as responsive as the old control. I could look into "virtualising" the control, but I'm not sure I want to delve into this at the moment.

2. We will need binding converters to set the Width of the canvas and the real note position(currently it is upside-down with low note numbers at the top) if we want to do this right. This means writing more code, and we start to lose the elegance of doing it all in XAML.

3. Using a ListBox means that there is mouse and keyboard handling built-in for us, but it probably does not do what we want. I found it became very unresponsive when I clicked around, and occasionally some of the notes appeared to be highlighted, but not the ones I expected. There may be a lower-level ItemsControl we could use instead of ListBox that could help us.

Conclusion

We want our final PianoRoll control to be easy to use with data binding, but I am not sure yet that this is the best approach internally for implementing a complex control like this. I'll probably progress without the Data Binding for now, but with a view to using Data Binding wherever it does make sense. As usual I welcome any comments and suggestions, as I am still very much a beginner when it comes to WPF.

Wednesday, 11 June 2008

NAudio Roadmap

My NAudio open source .NET audio library project has made some good progress in the past few weeks. I have successfully got playback with WASAPI working, and the Resampler DirectX Media object is also working (albeit with an annoying limitation that you cannot create it on one thread and use it on another). Also, for the first time in the history of this six year long project, I have someone very interested in joining the development team.

This marks an interesting new phase in the project, as when it is just me, I can keep all my plans in my head, but when the team expands then there needs to be proper planning and discussion of what we are doing. So here is my ideas for the near future (all time-dependent of course).

Version 1.2 - ASIO, WASAPI and Resampler DMO 'Tech Preview'

This will be released very soon as we do not yet have a public release demonstrating these technologies, and people are asking me to release a version that can do what I demonstrated in my resampler screencast a while ago.

Version 1.3

This will be a consolidation release, looking to raise the quality of the features we already are using.

  • A more full WASAPI implementation including audio capture and event-driven mode
  • Look into the possibility of wrapping some additional DMOs
  • More code in the NAudioDemo to demonstrate how the library is meant to be used, and also to ensure we can easily test features. Here's some of the features I want to add to this little project:
    • Use of the mixer stream
    • Use of ACM for format conversion
    • MP3 file reader (assuming it still works)
    • Wave File Writer
    • Use of simple DSP
    • A realtime FM Synth
  • Increase our unit test coverage. I think this will be important with extra developers that we can write unit tests to ensure that behaviour we are relying on for our applications is not broken by other features
  • Documentation - I want to write a few more blog entries here, as well as update the Wiki at CodePlex

Version 1.5

  • A design review of our core interfaces such as WaveStream, to see if we can come up with a more intuitive for all types of developers
  • Investigation of whether we can increase performance by using IntPtrs or unsafe pointers (while trying to remain friendly to VB programmers)
  • Introduction of some WPF controls
  • Reliable reader and writer streams for WMA, MP3, OGG (if possible)
  • Investigate possibility of using ASIO input
  • Investigate possibility of creating a VstHostWaveStream (possibly building on the work from VST.NET)
  • I am also considering whether we should move from the MS community license to the MS permissive license, to make using NAudio in commercial projects an easier decision for people.

Please feel free to add your own wishlist and ideas for the future of NAudio to this post.

Tuesday, 10 June 2008

Font Embedding in Silverlight 2 beta 2

I added a font to my SilverNibbles game this weekend as part of converting to beta 2. You can see it in action here.

The way to do this is relatively straightforward:

1. Add your font to the project. The build action should be Resource. You do not need to copy to the output directory. Visual Studio will put it into your DLL file at compile time. (n.b. If you choose Content instead, it will go into your XAP file which also works, but apparently loading fonts from the XAP will not be supported after beta 2 so this method is not recommended)

2. Now whenever you need to use the font, simply use the syntax FontFamily="Font Name.ttf#FontName".

Font Embedding in Silverlight

And that is all there is to it. 

Monday, 9 June 2008

Basic Button Templating in XAML in Silverlight 2 Beta 2

There has been lots of buzz about the new control templating mechanism introduced with Silverlight 2 beta 2. It looks like the main driver behind this is allowing you to template controls using Expression Blend. Scott Guthrie covers this in depth in this post.

However, I always like to know exactly what is going on with my XAML, and I needed to style a button for my SilverNibbles game, so I decided to see how hard it would be.

As usual, the best place to start is by looking in MSDN at the existing templates for the controls. Although these are often bewilderingly long chunks of XAML, most of the time, you can throw large portions of it away.

For example, my button only needs two visual states - normal and mouse over. I am just going to darken the background slightly when the mouse is over the button:

silverlight-basic-button-templating

I decided to put my style in the App.xaml file in the <Application.Resources> section. To start with, I just customised the font. Notice I have also added in a vsm namespace for use with the Visual State Manager later.

<Style 
    xmlns:vsm="clr-namespace:System.Windows;assembly=System.Windows"
    TargetType="Button"
    x:Key="NewGameButtonStyle">
    <Setter Property="FontFamily" Value="teen bold.ttf#Teen" />
    <Setter Property="FontSize" Value="18" />
</Style>

The next task is to put a Template into the Style and design the basic layout of our button. Although this looks like a lot of code, all it is is a Grid which contains a Border which contains a ContentPresenter. We could actually leave off most the ContentPresenter's properties, as our button does not need that level of customisation (we are only using it in one place). The Border brushes are set using named SolidColorBrush objects so we can animate them later if we wish.

<Setter Property="Template">
    <Setter.Value>
        <ControlTemplate TargetType="Button">
            <Grid>
                <Border BorderThickness="2" 
                        CornerRadius="4"
                        Padding="3"                                    
                        >
                    <Border.Background>
                        <SolidColorBrush x:Name="ButtonBackgroundBrush" Color="AliceBlue"/>
                    </Border.Background>
                    <Border.BorderBrush>
                        <SolidColorBrush x:Name="ButtonBorderBrush" Color="Black"/>
                    </Border.BorderBrush>
                    <ContentPresenter
                      Content="{TemplateBinding Content}"
                      ContentTemplate="{TemplateBinding ContentTemplate}"
                      HorizontalContentAlignment="{TemplateBinding HorizontalContentAlignment}"
                      Padding="{TemplateBinding Padding}"
                      TextAlignment="{TemplateBinding TextAlignment}"
                      TextDecorations="{TemplateBinding TextDecorations}"
                      TextWrapping="{TemplateBinding TextWrapping}"
                      VerticalContentAlignment="{TemplateBinding VerticalContentAlignment}"
                      Margin="4,2" />
                </Border>
            </Grid>
        </ControlTemplate>
    </Setter.Value>
</Setter>

Now the final task is to use the new VisualStateManager to tell our control what we want to happen on MouseOver. We will define one VisualStateGroup - the "CommonStates" group, which will contain two VisualStates and two VisualTransitions. The first VisualState is the Normal state, for which we don't need to do anything. The second VisualState is the MouseOver state, which contains a StoryBoard that animates the colour of the button's background. Notice that the duration is zero. This is a little confusing, but the duration will actually be set by the VisualTransitions. The VisualTransitions simply let us set the length of time over which we will change to the VisualStates. Here's our VisualStateGroups, which we have put inside the Grid XAML element:

<vsm:VisualStateManager.VisualStateGroups>
    <vsm:VisualStateGroup x:Name="CommonStates">

        <vsm:VisualStateGroup.Transitions>
            <vsm:VisualTransition To="MouseOver" Duration="0:0:0.2" />
            <vsm:VisualTransition To="Normal" Duration="0:0:0.2" />
        </vsm:VisualStateGroup.Transitions>

        <vsm:VisualState x:Name="Normal" />
        <vsm:VisualState x:Name="MouseOver">
            <Storyboard>
                <ColorAnimation 
                Storyboard.TargetName="ButtonBackgroundBrush"
                Storyboard.TargetProperty="Color"
                To="#C0C0C0"
                Duration="0" />
            </Storyboard>
        </vsm:VisualState>
    </vsm:VisualStateGroup>
</vsm:VisualStateManager.VisualStateGroups>

So templating controls is still perfectly possible in XAML, if you don't mind writing lots of it, but I guess that the intention now is for it all to be done in Expression Blend.

I'm hoping to find time over the next few weeks to update my series on styling a listbox to work with the new beta 2 templating model.

Sunday, 8 June 2008

Creating a Piano Roll in WPF Part 2

In a previous post, I demonstrated how easy it was to create a very rudimentary piano roll view in WPF. In this post, I will take things a stage further by giving the piano roll a better background. To achieve this, I have made two changes to the PianoRoll User Control we made previously. First, I have moved the ScrollViewer in so that it now is part of the PianoRoll control itself. Second, I now have three sub-canvases that will build up the data view in the Piano Roll control. Here is the new XAML for the PianoRoll control:

<UserControl x:Class="TestApp.PianoRoll"
    xmlns="http://schemas.microsoft.com/winfx/2006/xaml/presentation"
    xmlns:x="http://schemas.microsoft.com/winfx/2006/xaml"
    Height="Auto" Width="Auto">
    <ScrollViewer 
        x:Name="scrollViewer1"
        HorizontalScrollBarVisibility="Auto" 
        VerticalScrollBarVisibility="Auto">
    <Canvas x:Name="RootCanvas" Background="White">
        <Canvas x:Name="NoteBackgroundCanvas">
            <Canvas.RenderTransform>
                <ScaleTransform 
                     x:Name="NoteBackgroundRenderScaleTransform" 
                     ScaleX="1" ScaleY="1" />
            </Canvas.RenderTransform>
        </Canvas>
        <Canvas x:Name="GridCanvas" />
        <Canvas x:Name="NoteCanvas" />
    </Canvas>
    </ScrollViewer>
</UserControl>

The NoteBackgroundCanvas is used for drawing the horizontal lines that divide each of the 128 MIDI notes. We will also shade the lines that represent "black notes" on the piano slightly. Each of these horizontal lines we will simply make one unit wide, and a ScaleTransform will be used to ensure that they stretch the required amount. Here's the code that populates the background canvas.

private void CreateBackgroundCanvas()
{
    for (int note = 0; note < 128; note++)
    {
        if((note % 12 == 1) // C#
         ||(note % 12 == 3) // Eb
         ||(note % 12 == 6) // F#
         ||(note % 12 == 8) // Ab
         ||(note % 12 == 10)) // Bb
        {
            Rectangle rect = new Rectangle();
            rect.Height = yScale;
            rect.Width = 1;                    
            rect.Fill = blackNoteChannelBrush;
            rect.SetValue(Canvas.TopProperty, GetNoteYPosition(note));
            NoteBackgroundCanvas.Children.Add(rect);
        }
    }
    for (int note = 0; note < 128; note++)
    {
        Line line = new Line();
        line.X1 = 0;
        line.X2 = 1;
        line.Y1 = GetNoteYPosition(note);
        line.Y2 = GetNoteYPosition(note);
        line.Stroke = noteSeparatorBrush;
        NoteBackgroundCanvas.Children.Add(line);
    }
}

On top of the background canvas comes the GridCanvas. This contains the vertical lines showing where each measure and beat start. We can't draw this until we have loaded the MIDI events because we need to know how many MIDI ticks are in each quarter note, and also we need to know how many grid lines to draw. Here is the code that draws the grid.

private void DrawGrid()
{
    GridCanvas.Children.Clear();
    int beat = 0;
    for (long n = 0; n < lastPosition; n += midiEvents.DeltaTicksPerQuarterNote)
    {
        Line line = new Line();
        line.X1 = n * xScale;
        line.X2 = n * xScale;
        line.Y1 = 0;
        line.Y2 = 128 * yScale;
        if (beat % 4 == 0)
        {
            line.Stroke = measureSeparatorBrush;
        }
        else
        {
            line.Stroke = beatSeparatorBrush;
        }
        GridCanvas.Children.Add(line);
        beat++;
    }
}

The final change is to the drawing of the notes themselves. They are now drawn onto the NoteCanvas. When drawing is finished, the RootCanvas now must be resized rather than the UserControl because it is the RootCanvas that is the child element of the ScrollViewer. Finally, we need to adjust the scale transform on the NoteBackgroundCanvas to ensure that the horizontal lines and bars extend the whole way across.

private void DrawNotes()
{
    NoteCanvas.Children.Clear();

    NoteCanvas.Children.Add(MakeNoteRectangle(0, 0, midiEvents.DeltaTicksPerQuarterNote, 0));
    for (int track = 0; track < midiEvents.Tracks; track++)
    {
        foreach (MidiEvent midiEvent in midiEvents[track])
        {
            ...  // create note rectangles
        }
    }
    RootCanvas.Width = lastPosition * xScale;
    RootCanvas.Height = 128 * yScale;
    NoteBackgroundRenderScaleTransform.ScaleX = RootCanvas.Width;
}

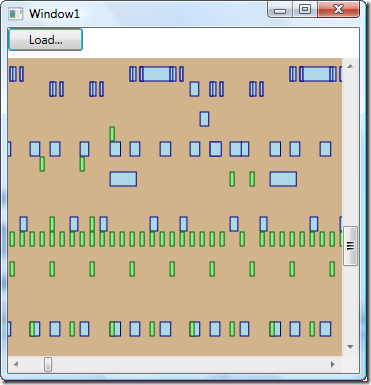
And here's what the PianoRoll control looks like now:

WPF Piano Roll

A nice improvement on before. The next stage will be to add horizontal zooming support and display the piano keyboard on the left.

Saturday, 7 June 2008

Screencast: Creating a WAV File Resampler with NAudio

To give a feel for just how simple it is to use NAudio for WAV file processing, I have made a short screencast demonstrating how to make a command line WAV file resampler. This uses the new ResamplerDmoStream that I have been making reading for the next release of NAudio. You can get it if you download the latest code from CodePlex.

To make the screencast, I used the very impressive Jing utility, which currently limits you to five minute screen captures, so it is in two parts (if you are having trouble viewing the files embedded on this page, try these links: Part 1, Part 2)...

Part 1

Part 2

Notes:

  • I did actually check the resulting WAV files to make sure they played OK!
  • I have not yet explored the boundaries of the Resampler DMO object, so I can't guarantee changing bit depths and channel counts will necessarily work
  • To resample to IEEE floating point format requires you to use an IEEE WaveFormat for the output. You can't just set a bit depth of 32.
  • We could have made the code even more succinct had I used the WaveFileWriter.CreateWaveFile static method which would take the resampler stream and the wave output filename as an input, thus reducing our application to a mere three lines of code.

Friday, 6 June 2008

Creating a Piano Roll Control in WPF

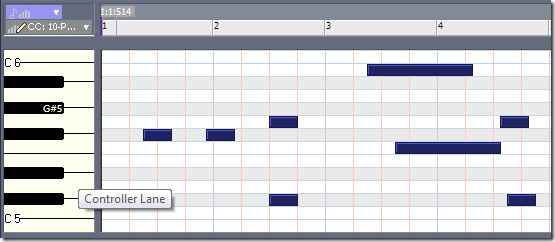
Those who work with MIDI data will know the importance of the "Piano Roll" view. This is a view that on the Y-axis shows the notes on a keyboard, while the X-axis represents time. The MIDI notes are then displayed as rectangles, which allows for a very intuitive editing experience. Here's a picture of the Piano Roll view in Cakewalk SONAR:

SONAR Piano Roll

Now obviously, this type of view has many more uses. It can be used for any categorised display of time-based data, whether that be audio recordings or train timetables or any number of things.

Writing this type of "time-line" based view as a Windows Forms control is no mean feat, but the power of WPF means that we can get a basic piano roll control up and running with minimal effort.

We start by creating a WPF User Control that will be the main display area for our note data:

<UserControl x:Class="TestApp.PianoRoll"
    xmlns="http://schemas.microsoft.com/winfx/2006/xaml/presentation"
    xmlns:x="http://schemas.microsoft.com/winfx/2006/xaml"
    Height="300" Width="300">
    <Canvas x:Name="NoteCanvas" />           
</UserControl>

All we have done so far is added a Canvas element called NoteCanvas. In the code behind for our PianoRoll control we are going to create a property that allows us to set the MIDI events we want to display. I am going to use my NAudio library to load the MIDI events from a standard MIDI file:

public partial class PianoRoll : UserControl
{
    MidiEventCollection midiEvents;
    double xScale = 1.0 / 10;
    double yScale = 15;

    public MidiEventCollection MidiEvents
    {
        get
        {
            return midiEvents;
        }
        set
        {
            // a quarter note is 20 units wide
            xScale = (20.0 / value.DeltaTicksPerQuarterNote);
            midiEvents = value;
            NoteCanvas.Children.Clear();

            long lastPosition = 0;
            for (int track = 0; track < midiEvents.Tracks; track++)
            {
                foreach (MidiEvent midiEvent in value[track])
                {
                    if (midiEvent.CommandCode == MidiCommandCode.NoteOn)
                    {
                        NoteOnEvent noteOn = (NoteOnEvent)midiEvent;
                        if (noteOn.OffEvent != null)
                        {
                            Rectangle rectangle = MakeNoteRectangle(noteOn.NoteNumber, noteOn.AbsoluteTime, noteOn.NoteLength, noteOn.Channel);
                            NoteCanvas.Children.Add(rectangle);
                            lastPosition = Math.Max(lastPosition, noteOn.AbsoluteTime + noteOn.NoteLength);
                        }
                    }
                }
            }
            this.Width = lastPosition * xScale;
            this.Height = 128 * yScale;
        }
    }

What is happening here is that when the MidiEvents property is passed a new MidiEventCollection, it clears everything from the canvas, and then goes through each "track", and for each NoteOnEvent that has a corresponding NoteOffEvent (which should be all of them but some MIDI files are badly formed), it creates a rectangle and adds it to the canvas.

The final thing that happens is the size of the UserControl (not the Canvas itself, which is quite happy to draw outside its own bounds) is adjusted to be big enough to display the entire MIDI file.

Here's the code that creates the Rectangle for a note. Each note has a height of 15 units, and its width is simply its length in MIDI ticks. However, I have used a horizontal scale factor to make the rectangle a more sensible size (making one quarter note 20 units wide):

private Rectangle MakeNoteRectangle(int noteNumber, long startTime, int duration, int channel)
{
    Rectangle rect = new Rectangle();
    if (channel == 10)
    {
        rect.Stroke = new SolidColorBrush(Colors.DarkGreen);
        rect.Fill = new SolidColorBrush(Colors.LightGreen);
        duration = midiEvents.DeltaTicksPerQuarterNote / 4;
    }
    else
    {
        rect.Stroke = new SolidColorBrush(Colors.DarkBlue);
        rect.Fill = new SolidColorBrush(Colors.LightBlue);
    }
    rect.Width = (double)duration * xScale;
    rect.Height = yScale;
    rect.SetValue(Canvas.TopProperty, (double)(127-noteNumber) * yScale);
    rect.SetValue(Canvas.LeftProperty, (double)startTime * xScale);
    return rect;
}

You will also notice that I have coloured notes differently on channel 10 (which by MIDI convention is for drums), and have normalised their lengths, as MIDI drum devices ignore note length and play the whole drum sample every time a NoteOn is triggered.

The Y position of each note is governed by the noteNumber, and we have reversed it so the low note numbers are at the bottom.

So now we have a very rudimentary Piano Roll display, we need to sort out scrollbars for it. For now, I have just put my piano roll control inside a scroll viewer. This gives a very simple way to let us scroll around. It is also the reason why we needed to resize our PianoRoll User Control when we added new events to it.

<ScrollViewer Margin="0,30,0,0" Name="scrollViewer1" Background="AliceBlue" 
              HorizontalScrollBarVisibility="Auto" 
              VerticalScrollBarVisibility="Auto">
    <me:PianoRoll x:Name="PianoRollControl" Background="Tan" 
        Width="Auto" Height="Auto"/>
</ScrollViewer>

And that is all there is to it. The final piece is to write some code to load a MIDI file into our piano control when the user clicks a button and selects a file:

private void button1_Click(object sender, RoutedEventArgs e)
{
    OpenFileDialog openFileDialog = new OpenFileDialog();
    openFileDialog.Filter = "MIDI Files (*.mid)|*.mid|All Files (*.*)|*.*";
    openFileDialog.FilterIndex = 1;
    if (openFileDialog.ShowDialog().Value)
    {
        MidiFile midiFile = new MidiFile(openFileDialog.FileName);
        this.PianoRollControl.MidiEvents = midiFile.Events;
    }
}

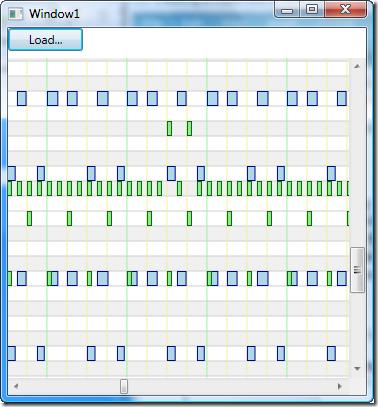
Now we can load any MIDI file in and see all the notes displayed in Piano Roll style:

wpf-piano-roll-part-1

Obviously there is still a way to go before this is a fully featured PianoRoll control. We need to add horizontal zooming (which is nice and easy thanks to the power of WPF RenderTransforms). We also need to add grid-lines, which again are very easy to do by adding another canvas for gridlines to our PianoRoll control. And of course the view of the piano on the left-hand side needs to be added, along with any capabilities for selecting and editing notes.

There may also be some slightly more clever ways of approaching this problem, perhaps using data-binding and making a custom layout control. And there may be performance issues to do with the number of items in the control, although I tested with several thousand without any noticeable problems.

But hopefully this post has shown just how easy it is to get started with this kind of rich user interface in WPF (or Silverlight), and perhaps I'll post again when I have enhanced the functionality of my Piano Roll control in the future.

Thursday, 5 June 2008

The NAudio WaveStream in Depth

Continuing my series of posts documenting the NAudio open source .NET audio library, I will look in a bit more detail today at the WaveStream class, which is the base class for several others in NAudio, and can be overridden to add functionality to the NAudio engine. For a higher level look at where the WaveStream fits into the big picture of Wave mixing, see this post.

Object Hierarchy

WaveStream is an abstract class that inherits from System.IO.Stream. I chose to do this because I wanted it to be easily interoperable with other streaming APIs. However, with hindsight this has not proved to be a crucial feature, and a WaveStream to Stream adapter class could easily be created so a future version of NAudio may change this, which would allow us greater flexibility over the interface design of WaveStream.

Abstract Members

These members of WaveStream must be implemented by any concrete class that derives from WaveStream. They represent the main functionality of WaveStream. This section serves as a guide to the things you must do if you create a custom WaveStream.

WaveFormat Property

Each WaveStream must report the WaveFormat that it uses (i.e. the sample rate, bit depth, number of channels etc). Some WaveStreams can simply pass on the WaveFormat of their source stream, while others (e.g. the WaveFormatConversionStream) change the format of their source stream, so must provide the output format.

long Stream.Position Property

The Position property is measured in bytes. I had thought for a while about whether it should be measured in sample frames, and this may be an option for a future version of NAudio. The advantage of using bytes is that it is less error prone keeping track of position and ties in with the return value of the Read function. There are some helper methods (see below) that allow you to use TimeSpans to position the stream which is useful for media player applications. Position 0 represents the start of the stream.

When setting position, you should lock the WaveStream. This is because a Read may well be happening at the same time. Often in audio playback applications, the callback to Read happens in another thread to the main GUI thread.

Often when you are setting the position, you need to reposition the underlying WaveStream(s). This will often involve a calculation as the input and output WaveFormats may not be the same, or there may be an offset in start positions. If this is the case, be careful to ensure that the underlying stream is never set to a non block-aligned position. If it is, the resulting audio will be garbage.

long Stream.Length Property

This read-only property returns the length of the stream in bytes. This is useful because it allows playback devices to know when the overall playback has ended. The WaveFileWriter also uses this to know how much data to write to the Wave file. Streams that have no definite end position should return long.MaxValue. Sometimes an effect will result in a longer output than the input stream (for example the tail of a reverb effect). In this case, this should be reflected by increasing the Length.

void Stream.Dispose Method

Wave Streams should override the Dispose(bool disposing) method to free any associated resources. The approach taken by NAudio is that WaveStreams will dispose any input WaveStreams when they are disposed, but obviously you can take a different approach if required. By contrast, the WaveStream rendering classes (e.g. WaveOut, WaveFileWriter) do not dispose of their input streams when they are disposed.

int Read(byte[] destBuffer, int offset, int numBytes) Method

This is where the real work of a WaveStream happens. This method will generate the required number of bytes of audio, often by reading from one or more source streams and processing the data in some way. There are a number of key considerations for the implementation of this function.

  • The code should be highly optimised. This code must run several times a second if playing audio at low latencies. Avoid creating any new objects in this method if possible.
  • A lock should be taken to avoid the stream being repositioned during a read, which can cause unpredictable behaviour
  • Thought should be given on what to do if insufficient data is available to fulfil the request. With some types of WaveStream it is sufficient to return less than numBytes, but any WaveStream that will be connected directly to an audio output device will need to continue returning data past its own end position. Otherwise there will be nothing to fill the audio device buffers with and playback will stop (or stutter). Obviously if your source is a Wave file you can read ahead, but if your source is an audio capture device, there is no way of reading into the future.
  • This function should make sure that the Position property is updated. It is simplest to have a private position member variable that is updated with the number of bytes read each time.

Inheriting from System.IO.Stream has meant that we are tied to a Read method signature that is perhaps not ideal in all circumstances. Some WaveStream derived classes would benefit from a Read method that takes an array of floats or shorts, while others would benefit from using an IntPtr or unsafe byte, short or float pointer. This is part of the reason I wish Microsoft would let us cast more freely between struct types. I have some ideas for how the WaveStream base class could be made more flexible in a future version, but for now, you must always write your WaveStream output into the byte array provided.

Another possible limitation of WaveStream is that it currently offers no way of reporting any latency it introduces. Some types of DSP will introduce a delay. When you are playing back pre-recorded data, it is possible to compensate for that delay. Again, this is something I may look to introduce in a future version of NAudio, particularly if I ever get round to writing a WaveStream that can host a VST effect, which has been a long-term intention of mine.

Other WaveStream Members

These members of WaveStream are implemented in the base class. You may wish to override some of them, but on the whole they can be left alone.

bool Stream.CanRead Property

Implemented by the WaveStream base class and returns true.

bool Stream.CanSeek Property

Implemented by the WaveSteam base class and returns true.

bool Stream.CanWrite Property

Implemented by the WaveStream base class and returns false.

Stream.Flush Method

Implemented by the WaveStream base class. Does not do anything.

Stream.Seek Method

This is implemented by the WaveStream base class. It simply turns the methods into a call to the Position property setter.

Stream.SetLength Method

Throws a Not Supported Exception.

Stream.Write Method

Throws a Not Supported Exception.

int GetReadSize(int milliseconds)

Helper function that returns a recommended read size given a desired number of milliseconds of audio. The base class implementation calculates this using the WaveFormat.AverageBytesPerSecond property. This does not typically need to be overridden in derived WaveStream classes.

int BlockAlign Property

The base implementation simply gives quick access to the WaveFormat.BlockAlign property.

void Skip(int seconds) Method

This is a helper method that advances (or rewinds if seconds is negative) by the specified duration.

TimeSpan CurrentTime Property

This helper method allows you to access the current position in terms of a TimeSpan. You can also set the position using this method. The base class implementation uses the WaveFormat.AverageBytesPerSecond property to do its calculation.

TimeSpan TotalTime Property

This returns the length of the stream expressed as a timespan.

bool HasData(int count) Method

This function is intended to help optimise the mixing of streams. You can ask whether the stream has any non-zero data in the next count bytes. The default implementation returns true if the current Position is less than the Length. Overriding this in derived WaveStream classes allows the mixer to skip over this stream if it has no data, thus speeding things up. However, HasData should always be quick to run.

Wednesday, 4 June 2008

NAudio Wave Stream Architecture

This post explains the basic architecture for audio streaming with the NAudio .NET open source audio library. The most important concept to understand is a Wave Stream. This is simply a stream of audio data, in any format, that can be read from and repositioned. In NAudio, all Wave Streams inherit from WaveStream, which in turn inherits from System.IO.Stream. NAudio ships with a number of highly useful WaveStream derived classes, but there is nothing stopping you creating your own.

Many types of Wave Stream accept input from one or more other Wave Streams and process that data in some way. For example, the WaveChannel32 stream turns mono 16 bit WAV data into stereo 32 bit data, and allows you to adjust panning and volume at the same time. The WaveMixer32 stream can take any number of 32 bit input streams and mix them together to produce a single output. The WaveFormatConversionStream will attempt to find an ACM codec that performs the format conversion you wish. For example, you might have some ADPCM compressed audio that you wish to decompress to PCM. Another common use of WaveStreams is to apply audio effects such as EQ, reverb or compression to the signal.

Obviously, you need a starting point for your Wave data to come from. The most common options are the WaveFileReader which can read standard WAV files, and the WaveInStream which captures data from a soundcard. Other examples that you might want to create would be a software synthesizer, emitting sound according to the notes the user was playing on a MIDI keyboard.

Once you have processed your audio data, you will want to render it somewhere. The two main options are to an audio device or to a file. NAudio provides a variety of options here. The most common are WaveOut which allows playback of a WaveStream using the WinMM APIs and WaveFileWriter which can write standard WAV files.

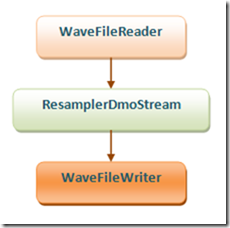
The following example shows a very simple graph which reads from one WAV file and passes the data through the DMO Resampler Wave Stream before writing it out to another WAV file. This would be all you needed to create your own WAV file resampling utility:

 NAudioResample

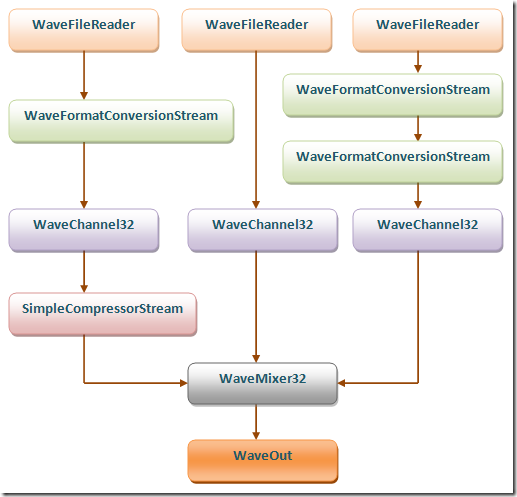
Of course, you can do much more complicated things with Wave Streams. The next example shows three WaveFileReader objects as the inputs. Two of them go through some stages of format conversion before they are all converted into IEEE 32 bit audio. Then one of the streams goes through an audio compressor effect to adjust its dynamic range, before all three streams are mixed together by WaveMixer32. The output could be processed further, but in this example it is simply played out of the soundcard using WaveOut.

NAudioStreams

Hopefully this gives a good flavour of the type of things possible with WaveStreams in NAudio. In a future post, I will explain how to create your own custom WaveStream, and I will discuss in more depth the design decisions behind the WaveStream class.

Tuesday, 3 June 2008

Introducing NAudio - .NET Audio Toolkit

Although I have been developing NAudio for six years now, I have never really written much by way of documentation for it. This post is the first in a series that will attempt to rectify this shortcoming.

What Is NAudio?

NAudio is an open source .NET audio toolkit, containing a variety of classes for working with audio files and devices in Windows. Its key features are:

  • Standard WAV file reading and writing
  • A pluggable wave streaming architecture including various mixers, format conversion and some basic effects
  • Full access to installed ACM codecs
  • Individual WAV samples can be accessed
  • Audio playback and recording using the WinMM APIs
  • Handling compressed WAV files using
  • Extensive MIDI file handling and processing
  • Ability to receive MIDI events
  • Soundfont reading
  • OGG file encoding
  • Various experimental DSP functions
  • A selection of Windows Forms controls for audio related GUIs
  • Cakewalk drum map reading
  • RGCAudio sfz sampler file reading
  • Audio output using DirectSound
  • Audio output using ASIO
  • Vista CoreAudio API wrappers
  • DirectX Media Object wrappers

All this resides in NAudio.dll which can easily be linked to and used from your projects. Not all the features listed are production quality yet, but I will be writing up tutorials on some of the more mature parts of the framework in the future.

In addition to this, NAudio is the basis for a variety of utilities, some of which have moved off into their own CodePlex projects.

  • AudioFileInspector is a debugging tool that allows you to simply get textual information on WAV files, MIDI files and SoundFonts.
  • MIDI File Converter can convert MIDI files between different MIDI file types (useful for fixing up some drum loops to work with different sequencers)
  • MIDI File Mapper can batch process MIDI files remapping their notes, and performing other transformations on the data. Very useful for converting MIDI drum loops to work with different drum samplers.
  • MIDI File Splitter is another utility for working with drum loops. It can split long MIDI files at markers.
  • MixDiff demonstrates how to use the Wave Playback features of NAudio. It is intended to allow you to perform double-blind listening tests on different versions of a mix you are working on. It has yet to be properly released.
  • NAudioDemo is still very incomplete, but the intention is to create an application that showcases all the features of NAudio, and so serve as a coding tutorial.

Rationale

When .NET came out I was very excited that Microsoft had created a technology that combined the strengths of MFC, Visual Basic 6 and Java, whilst having very few of their limitations. I wanted to do as much future development in .NET as possible. The only trouble was, a lot of the applications I was writing were dealing with various audio file formats, or processing audio and playing it back.

It seemed that very few open source projects dealing with audio were around back then, and today there still are not that many. So I decided to create my own library, slowly adding whatever bits and pieces I needed to it. I fully expected Microsoft to come along and blow most of it away with a low-level audio stack for .NET but that never happened. And while a handful of other .NET audio libraries have showed up, none seem to have quite the same focus.

History

I started work on NAudio shortly after .NET 1.0 first came out. I had a Pentium III 450MHz PC back then, and one of the first things I implemented was the interop to the WinMM mixer APIs, complete with forms that auto-populated themselves with sliders. I haven't used the code much since, and I expect I would cringe if I looked back at it now.

The next task was to read Wave Files and play them back using the WaveOut APIs. This took me into a whole world of pain - interop in a garbage collected language. Eventually I got it all working and could play 44.1kHz wave files at a latency of around 400ms.

It was about this time I set up a SourceForge project for NAudio but I never really got on with using CVS.

I also ported a lot of code I had written for working with SoundFonts to C#. The only thing I couldn't get working in C# was the API for loading SoundFonts into the Soundblaster Live card. It used pointers to tables of function pointers, which was out of my depth for interop. I did create a managed C++ library for it though, but before long I had become fed up with Soundblaster's appalling driver support in XP and bought a new soundcard so that part of NAudio came to an end.

The next few years were spent slowly ramping up the MIDI library, and enhancing the Wave playback. I also added DirectSound ouput option. In 2005 I started work at a new company, and realised that a lot of the work I had done in NAudio could be useful for one of their products. I started working in earnest on getting ACM working well which eventually allowed me to use NAudio to form the basis of the audio mixing library for one of my company's key products. It performs well, mixing upwards of 30 concurrent streams of audio (albeit at 8kHz sample rate), and passing through various ACM effects. We work at a latency of around 200ms with no noticeable stuttering even on fairly modest PCs (Pentium IV 2Ghz).

During this time some features were added to NAudio that were eventually  dropped. I ported JavaLayer (a Java MP3 decoder) over to C#, but got fed up of constantly needing to update it. Version 1 is out now though, so perhaps it might be worth another go. I also attempted to create wrappers for Steinberg's VST, but the job took longer than I was hoping, and in any case, a promising new project has been created by someone else - VST.NET.

In more recent times, I have added an ASIO output option, and am currently working on adding Vista's CoreAudio WASAPI interface, and access to DirectX Media Objects. I am increasingly trying to write NUnit unit tests for the new features I am developing.

As for the future, NAudio will continue to progress based on the features I need for the applications I am working on. I have no shortage of ideas for audio utilities, but sadly time is at a premium. I'm hoping to create a new release in the near future if I can get the Resampler DMO object working nicely with WASAPI.

Monday, 2 June 2008

What's up with WASAPI?

Windows Vista introduced a new series of APIs for audio, called CoreAudio. This includes WASAPI (Windows Audio Session API), a brand new API for capturing and rendering audio.

Decisions, Decisions

Of course, there were always ways of dealing with audio in previous versions of Windows. And they are still available in Vista, so there is no need to move if you don't want to. Here's the main choices...

  • WinMM - these are the APIs that have been around for ages (e.g. the waveOut... and waveIn... functions). Their main limitation is poor latency (its hard to go much below 50ms without dropouts).
  • DirectSound - has its uses, particularly for game development, but it appears Microsoft is phasing this out too.
  • Kernel Streaming - this is what most of the pro audio applications use to talk directly to the WDM driver with minimal latency.
  • ASIO - This is a Steinberg audio interface model used by virtually all pro audio applications and is usually the best way to work at very low latencies. Pro audio sound card manufacturers provide ASIO drivers. Its one weakness is that you can only use one ASIO driver at a time, which has potential to cause issues in the future as more and more studio equipment such as microphones, sound modules and monitors (that's what speakers are called in the world of pro audio) come with USB interfaces rather than the older model of plugging all your ins and outs into a single audio interface.

Why Yet Another Audio API?

So why has Microsoft added WASAPI to the list?

  • First, Vista has a completely new audio mixing engine, so WASAPI gives you the chance to plug directly into it rather than going through a layer of abstraction. The reasons for the new audio engine are:
    • A move to 32 bit floating point rather than 16 bit, which greatly improves audio quality when dealing with multiple audio streams or effects.
    • A move from kernel mode into user mode in a bid to increase system stability (bad drivers can't take the system down).
    • The concept of endpoints rather than audio devices - making it easier for Windows users to send sounds to "headphones" or record sound from "microphone" rather than requiring them to know technical details about the soundcards installed on their system
    • Grouping audio streams. In Vista, you can group together all audio streams out of a single application and control their volume separately. In other words, a per-application volume control. This is a bit more involved than might be at first thought, because some applications such as IE host all kinds of processes and plugins that all play sound in their own way.
  • Second, the intention was to support pro audio applications which needed to be as close to the metal as possible, and keep latency to a bare minimum. (see Larry Osterman's Where does WASAPI fit in the big multimedia API picture?)

Learning WASAPI

Documentation on WASAPI is fairly sparse despite Vista being out for well over a year now. The best places at the moment to go are:

Who's Using It?

So is anyone actually using WASAPI? Well, I use a variety of pro audio applications, each of which offer the user a selection from a variety of APIs, and yet none of them have added WASAPI to the list. Even Cakewalk, who seem to be very loyal to Microsoft, have stuck with kernel streaming to access the new WaveRT driver model rather than using WASAPI.

The trouble seems to be that WASAPI doesn't offer anything that WDM Kernel Streaming doesn't already, and since WASAPI is Vista only, there is no incentive to switch. And with Windows XP not looking like it will go out of common usage for a very long time, writing a new application based on WASAPI doesn't make much sense.

But what about slightly less pro audio applications? What if someone is writing a new application that wants to deal in some way with individual audio samples, and is able to target just Vista and above. Could they choose to use WASAPI? It all depends on how much work they are willing to do...

Rendering Modes

WASAPI gives two options for audio rendering - Shared mode and Exclusive mode. In exclusive mode, you are the only application talking to the audio endpoint in question - all other applications cannot make any noise. This gives the absolutely best performance possible, so would the choice of all pro audio applications like Cubase, SONAR, REAPER, Pro Tools etc. But as I have already said, they are not using WASAPI. They are using ASIO or Kernel Streaming.

Which leaves us with shared mode. This allows you to share the endpoint with other applications. In other words, you can still hear your Windows sounds etc. Of course, when you share an endpoint, one application might want to play sound at 48kHz 24 bit stereo, while another wants to play it at 22kHz 16 bit mono. With the WinMM APIs, this is no problem - built in converters will convert each audio stream to the format of the Windows mixing engine.

The Missing Feature

Now I have been creating a set of .NET wrappers for WASAPI as part of my NAudio open source audio library. After the pain of writing the mountains of COM interop required to get .NET talking to WASAPI, I hit a brick wall. WASAPI does not offer sample rate conversion. In other words, to use shared mode, you must either hope that the Vista machine's audio engine is set to the exact sample rate of your audio, or you must write your own sample rate converter. And sample rate conversion is by no means trivial. Especially if your criteria are that it must not degrade the audio quality and it must be as fast as possible.

Why on earth could Microsoft not have given us SRC with WASAPI? Sure latency will be affected (or to be more accurate, processor load will increase, making lower latencies harder to achieve). But this is taken for granted with shared mode. We know that when we are sharing the endpoint then SRC must occur somewhere. Microsoft already have done the R&D to create a configurable performant Sample Rate Converter. Why not let WASAPI plug it in automatically (or at least give us a flag to ask WASAPI to do SRC for us)?

The upshot of this is that for me to continue with my WASAPI .NET interop I now have to wrap the Audio Resampler DSP DMO (DirectX Media Object), which is a whole new can of worms (perhaps another blog post later).

The Future of WASAPI

WASAPI is here to stay, but if it is to be used more widely, it needs to be made more developer friendly. There is I guess the possibility that pro audio companies will look to it more as we go to 64 bit Windows and as more people move to Vista, but it will really be able to pick up some traction if it was easier to use in shared mode. Here's my two suggestions...

  • Build in sample rate conversion in shared mode (and exclusive mode for those using sample rates not supported by the device)
  • Build a low-level audio API in .NET as part of the next version of the .NET framework, using a simple model of Wave Streams that can be plugged together and connected to WASAPI endpoint devices (or other driver models or file types). More on this in a future blogpost though.